Surfing, it’s so simple! 上網就該如此簡單!,如同大陸同胞常喊的,Shadowsocks跟Squid一樣是很成熟的Proxy程式了,雖然我自己是比較喜歡Squid,但是應用在手機上連線就比較麻煩了,免費VPN一大堆,可是限制很多、不然就是廣告一大堆 🙁 所以選擇了占用資源最少的shadowsocks-libev,而且全部透過dnf安裝,在Debian 11, CentOS 6.10 (Final)、7.6.1810安裝上也順利成功執行,方便性非常高🤖🤓🤖
至於說為什麼要選買VPS裝Shadowsocks不直接買VPN呢,比如說在HostUS租個最便宜的KVM-0.5方案(512MB記憶體、750GB流量),一年只需要45美金(約1,400台幣),若是在RamNode租512MB SKVMS方案(512MB記憶體、1TB流量),一年只需要32.40美金(約1,010台幣),所以如果擔心網速慢又不想跟太多人共用頻寬,而且沒有特殊需要切換國家的需求,如果又想學習操作Linux(或是過個乾癮?!),買個便宜的VPS來裝Shadowsocks做VPN應用是最實惠的 🤖🤓🤖
安裝方法
### 階段A. Debian
|
1 2 3 |
sudo apt update sudo apt install -y shadowsocks-libev # 接著直接往下跳到建立設定檔的階段C |
### 階段B. CentOS 8
B1. 安裝epel的軟體源
|
1 2 |
cd /opt sudo yum install -y dnf epel-release |
B2. 下載repo
|
1 2 3 4 |
rm -f /etc/yum.repos.d/outman-shadowsocks-libev.repo URL=https://copr.fedorainfracloud.org/coprs/outman/shadowsocks-libev/repo/epel-8/outman-shadowsocks-libev-epel-8.repo curl -sSL "$URL" -o /etc/yum.repos.d/outman-shadowsocks-libev.repo cat /etc/yum.repos.d/outman-shadowsocks-libev.repo |
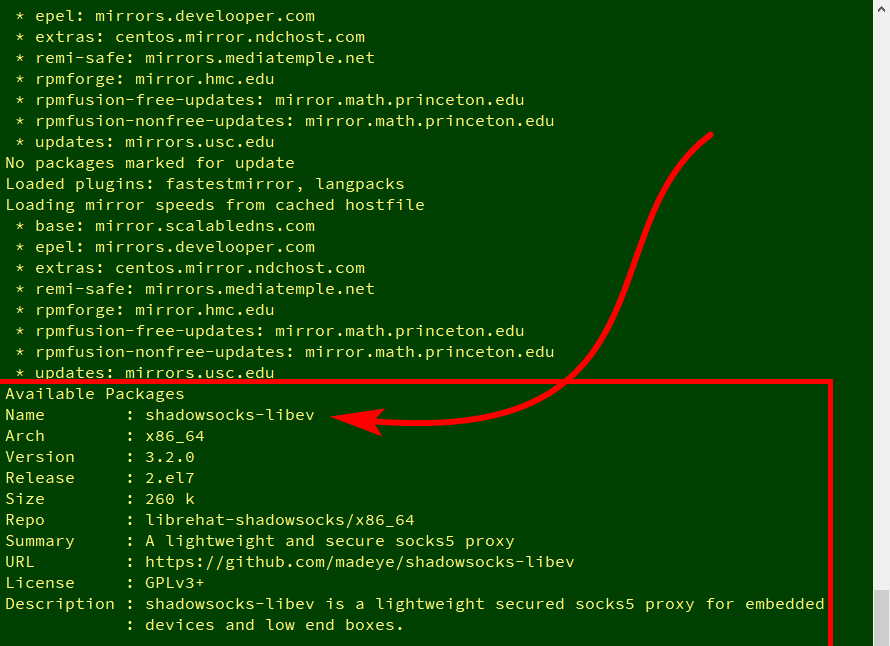
B3. 安裝依賴套件並更新系統,此時應該會出現有shadowsocks-libev可以安裝了 🤓
|
1 |
sudo dnf update -y && dnf info shadowsocks-libev |
B4. 安裝shadowsocks-libev
|
1 |
sudo dnf install -y libsodium simple-obfs shadowsocks-libev |
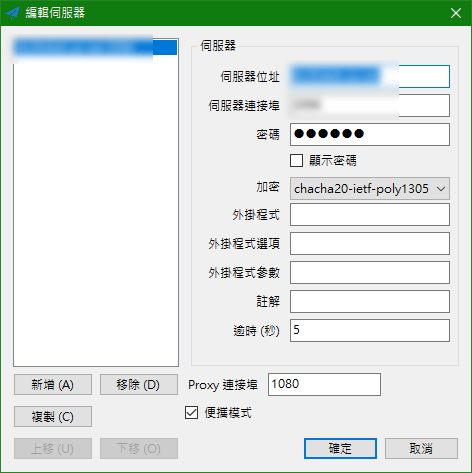
### C. 修改設定檔,請注意server_port、password兩個部分可以自訂,其他無須修改
|
1 2 3 4 5 6 7 8 9 10 11 |
rm -f /etc/shadowsocks-libev/config.json cat >> /etc/shadowsocks-libev/config.json <<- EOF { "server":["::0","0.0.0.0"], "mode":"tcp_and_udp", "server_port":8088, "password":"520be", "timeout":60, "method":"chacha20-ietf-poly1305" } EOF |
### D. 設定防火牆,將自訂的8088連接埠加入白名單(預設是8388)
|
1 2 3 4 5 |
service iptables stop iptables -A INPUT -p tcp --dport 8088 -j ACCEPT iptables -A INPUT -p udp --dport 8088 -j ACCEPT service iptables save systemctl restart iptables |
# firewalld切換成下列指令
|
1 2 3 |
firewall-cmd --permanent --add-port=8088/tcp firewall-cmd --permanent --add-port=8088/udp firewall-cmd --reload |
### F. 啟用shadowsocks-libev服務並啟動shadowsocks-libev
|
1 2 |
systemctl enable shadowsocks-libev systemctl start shadowsocks-libev |
額外的指令
# 檢查shadowsocks-libev啟動狀態
systemctl restart shadowsocks-libev

systemctl status shadowsocks-libev -l

ps ax | grep ss-server

netstat -atunp | grep ss-server
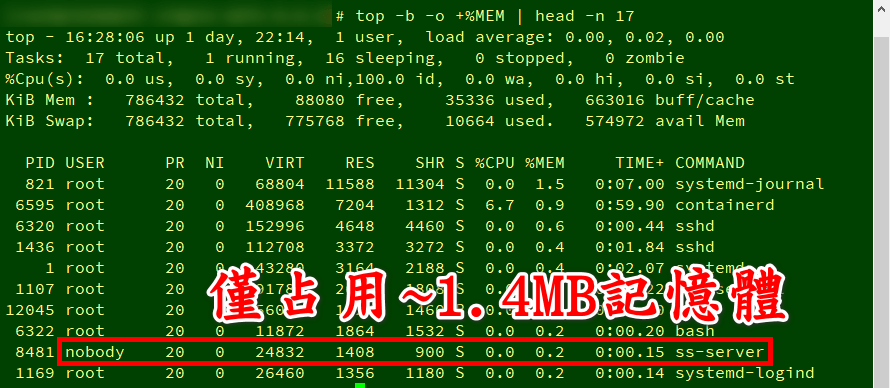
# 查詢最消耗記憶體的程式
top -b -o +%MEM
# (可選)最佳化系統的吞吐量、支撐能力
|
1 2 3 4 5 6 7 8 9 10 11 12 13 14 15 16 17 18 19 20 21 22 23 24 25 26 27 28 |
ulimit -n 51200 sysctl -w net.core.default_qdisc=fq sysctl -w net.core.rmem_default=65536 sysctl -w net.core.wmem_default=65536 sysctl -w net.core.rmem_max=67108864 sysctl -w net.core.wmem_max=67108864 sysctl -w net.core.netdev_max_backlog=4096 sysctl -w net.ipv4.tcp_congestion_control=htcp sysctl -w net.ipv4.tcp_mtu_probing=1 sysctl -w net.ipv4.tcp_rmem='4096 87380 33554432' sysctl -w net.ipv4.tcp_wmem='4096 65536 33554432' # 個人常用的最佳化指令開始 sysctl -w net.core.optmem_max=25165824 sysctl -w net.core.somaxconn=4096 sysctl -w net.ipv4.ip_forward=1 sysctl -w net.ipv4.route.flush=1 sysctl -w net.ipv4.tcp_fastopen=3 sysctl -w net.ipv4.tcp_fin_timeout=30 sysctl -w net.ipv4.tcp_keepalive_time=1200 sysctl -w net.ipv4.tcp_max_syn_backlog=4096 sysctl -w net.ipv4.tcp_max_tw_buckets=1440000 sysctl -w net.ipv4.tcp_mtu_probing=1 sysctl -w net.ipv4.tcp_syncookies=1 sysctl -w net.ipv4.tcp_tw_recycle=0 sysctl -w net.ipv4.tcp_tw_reuse=1 sysctl -w fs.file-max=2097152 ###個人常用的最佳化指令結束 sysctl --system |
- ref.
- librehat/shadowsocks
- Shadowsocks 使用說明 · shadowsocks Wiki
- Shadowsocks Windows 使用說明 · shadowsocks Wiki
- Configuration via Config File · shadowsocks Wiki
- Troubleshooting · shadowsocks Wiki
- Optimizing Shadowsocks · shadowsocks Wiki
客戶端
- Android
- iOS
- 瀏覽器
- Windows
- Mac OS
- Linux
- OpenWRT
pip install shadowsocks- Shadowsocks-Qt5 @ GitHub
- Outline @ GitHub
opkg install shadowsocks-libevopkg install shadowsocks-libev-polarssl